Monday, May 21, 2018
Apps Privacy Policy
Privacy Policy.
Our Apps or services (“We”) are committed to protect the privacy of its users ("users" or "you").
This Privacy Policy has been created to inform you about how our game manages, collects, stores and uses the information you provide in connection with our games (“Service”) , which includes “Puzzle Words” , “Kids Puzzle Mix” , “Kids Puzzle Words”, "Puzzle Fever". Please note that the scope of this Privacy Policy is limited only to information collected by us through your use of a Service. By using the Service, you agree to the collection and use of your personal information as outlined in this Privacy Policy. We may amend the Privacy Policy from time to time, and we encourage you to consult the Privacy Policy regularly for changes.
Important information and disclaimer
Our Apps or services do not collect and store any kind of personal information concerning the users. With exception of the following, our apps are distributed through third party app store services providers. Those providers collect information concerning their users as according to theirs Privacy Policies. Our Apps "We" can't be hold responsible in any way for the collection, processing or storing of this information. For more information about the collection, processing or storage of your information by those service providers, can be found on web-sites. Important to know that "We" only work with service providers that comply to the legal user privacy rights.
Information Collected and Used
Our primary objective in collecting user information is to provide and enhance the Service and to enable users to enjoy the Service.
When you install any of the Services, we may process the information you provide to us, whether through the Services or through social network or other third party services ("Account Information").
The type of information may include:
(1) Your Name, Gender,Age,Email Address, Social media contacts
(2)Information about the physical hardware address of the mobile device or other devices can be identified;
(3)Would you like to share hobbies, interests, etc.
We may acquire information from you through:
(1) Your access and participation in message boards on the Service;
(2) Your email of a question to our customer support;
(3) Your purchase of a virtual product of any type.
Please note that because a third party site manages the purchases of virtual goods offered by the Service, we do not have access to your credit card details and billing information.
In all cases of data access and collection, the information you provide will not be disclosed, rented, loaned, leased, sold, or otherwise voluntarily distributed to unaffiliated third parties and will be used solely for the purpose of providing you with and improving the Service and for any other purpose stated herein. We will retain your information for as long as your account is active or as needed to provide you services. If you wish to cancel your account or request that we no longer use your information contact us at the email address provided in the Contact Us section below. Note that there may be instances where we are legally required to retain your information.
Children under the Age Of 13 and Minor
The apps user scope is mainly targeted to children under the age of 13. We do not collect or request any personal information from children under the age of 13 or Minor.
Changing or Deleting Your Information
You may review, update, correct or delete any personal information. If you completely delete all this information, your account may become deactivated. If you would like us to delete your record in our system, please contact us at DigiToyzone@gmail.com and we will attempt to accommodate your request if we are not legally obligated to retain the record.
Security
We have put in place reasonable technical and organizational measures designed to secure the processing of any personal information from unauthorized access, use, alteration or disclosure. However, we cannot guarantee that unauthorized third parties will never be able to overcome those measures or use your personal information for improper purposes. Also please note that email and messaging systems are not considered secure, so we discourage you from sending us personal information through these mediums.
Contact us
If you have any questions about this privacy policy, please do not hesitate to contact us at
DigiToyzone@gmail.com
Tuesday, February 13, 2018
C# UWP & Xbox Live Creators - Display Gamertag sample
Setup UWP with Xbox Live sample C# properly
Project setup
- Nuget Package Manager : Microsoft.Xbox.Live.SDK.WinRT.UWP
- Build-Project
- References :
- Universal APP \ Extensions \ Visual C++ 2015 UWP Desktop Runtime for native apps (version 14)
- DEBUG folder : Microsoft.Xbox.Services.winmd
Code samples
User
//ini user - actual system user
private static XboxLiveUser XboxUser = new XboxLiveUser();//or
//specific system user
var allUser = await Windows.System.User.FindAllAsync();
var validSysUser = allUser.Where(u => (u.Type != Windows.System.UserType.LocalGuest || u.Type != Windows.System.UserType.RemoteGuest)).ToList();
XboxLiveUser XboxUser = new XboxLiveUser(validSysUser.FirstOrDefault());
//XBOX for FullHD on TV-SCREENS
bool result = Windows.UI.ViewManagement.ApplicationViewScaling.TrySetDisableLayoutScaling(true);
Windows.UI.ViewManagement.ApplicationView.GetForCurrentView().SetDesiredBoundsMode(Windows.UI.ViewManagement.ApplicationViewBoundsMode.UseCoreWindow);
Sign-in
public static async Task<XboxLiveUser> GetXboxLiveUser()
{
//var allUser = await Windows.System.User.FindAllAsync();
//var validSysUser = allUser.Where(u => (u.Type != Windows.System.UserType.LocalGuest || u.Type != Windows.System.UserType.RemoteGuest)).ToList();
//XboxLiveUser XboxUser = new XboxLiveUser(validSysUser.FirstOrDefault());
if (!XboxUser.IsSignedIn)
{
var r = await XboxUser.SignInAsync(Windows.ApplicationModel.Core.CoreApplication.MainView.CoreWindow.Dispatcher);
}
return XboxUser;
}
Monday, January 2, 2017
Javascript library for Youtube v3 data api
Hej all,
I wrote a Javascript based library for interaction with the youtube v3 data api.
It supports the following functions:
I wrote a Javascript based library for interaction with the youtube v3 data api.
It supports the following functions:
- Search for videos or channels based on keywords
- Get channel information based on channelid (title, description, subscribers, viewcount, banners)
- Get videos for a channel id (including stats)
- Get video stats based on channel id (single video)
- Get videos stats based on channel id (multiple videos in one request)
It's working fine for the functions above and this is still work in progress as I will implement OAuth2 support.
Source code is available on Git : GIT
Enjoy and happy coding !
Tuesday, December 27, 2016
Python 3.5 Youtube v3 data api module
Hej all,
I'm currently working on a Django web project that integrates some parts of youtube.com and for this purposes I wrote a small module to retrieve channel and video information aswell as searching for channel and videos based on keywords.
The module is working fine for the above and still work in progress, I will add Oauth2 support and allow for maintenance operations to be done as well.
The source and distribution is available on GIT : https://github.com/dtrammer/YoutubeAPI
Enjoy and happy coding !
How to - configure Visual Studio Code with Python 3.5.2 virtual project
Hej all,
A small how-to on how to configure Visual Studio Code to launch the python interpreter for your current virtual environment you're working with.
1. Open your Python project folder in Visual Studio Code
2. In the folder root create a new directory -> ".vscode" (Skip this step if it's already there)
3. In the ".vscode" directory create a new file -> "settings.json"
Add the following text to this file and save :
{
"python.pythonPath":"C:\\PATH\\TO\\YOUR\\VIRTUAL\\PROJECT\\FOLDER\\Scripts\\python",
"python.autoComplete.extraPaths": [
"C:\\PATH\\TO\\YOUR\\VIRTUAL\\PROJECT\\FOLDER\\Scripts",
"C:\\PATH\\TO\\YOUR\\VIRTUAL\\PROJECT\\FOLDER\\Lib\\site-packages"
]
}
4. In the ".vscode" directory create a new file -> "tasks.json"
Add the folowing text to this file and save :
{
"version": "0.1.0",
"command": "C:\\PATH\\TO\\YOUR\\VIRTUAL\\PROJECT\\FOLDER\\Scripts\\python",
"isShellCommand": true,
"showOutput": "always",
"args": ["${file}"]
}
A small how-to on how to configure Visual Studio Code to launch the python interpreter for your current virtual environment you're working with.
1. Open your Python project folder in Visual Studio Code
2. In the folder root create a new directory -> ".vscode" (Skip this step if it's already there)
3. In the ".vscode" directory create a new file -> "settings.json"
{
"python.pythonPath":"C:\\PATH\\TO\\YOUR\\VIRTUAL\\PROJECT\\FOLDER\\Scripts\\python",
"python.autoComplete.extraPaths": [
"C:\\PATH\\TO\\YOUR\\VIRTUAL\\PROJECT\\FOLDER\\Scripts",
"C:\\PATH\\TO\\YOUR\\VIRTUAL\\PROJECT\\FOLDER\\Lib\\site-packages"
]
}
- This will enable auto-complete, debug and to run the scripts with right-click on the file "Run python file in terminal"
4. In the ".vscode" directory create a new file -> "tasks.json"
Add the folowing text to this file and save :
{
"version": "0.1.0",
"command": "C:\\PATH\\TO\\YOUR\\VIRTUAL\\PROJECT\\FOLDER\\Scripts\\python",
"isShellCommand": true,
"showOutput": "always",
"args": ["${file}"]
}
- This enables you to use "cntrl+shift+B" and run the actual selected script file
You simply restart Visual Studio Code and you're ready to go, happy coding !
Sunday, December 18, 2016
Guide - How to setup Django 1.10 with Python 3.5.2 x64 and MySQL 5.7 x64 on Windows 10 x64
Hej all,
I published a guide yesterday on how to setup Django with MySQL and Python 3.4.3,
I mentioned that I will test for the latest Python 3.5.2 release, and got this to work.
Basically you can follow the steps of the guide mentioned above except for step 4 (mysqlclient installation). Here you can use the following wheel file instead.
Works like a charm ;) and happy coding !
Saturday, December 17, 2016
Guide - How to setup Django 1.10.4 with Python 3.4.3 x64 and MySQL 5.7 x64 - Windows10 x64
Hej all!
A small guide here on how to setup Django 1.10.4 with Python 3.4.3 and MySQL 5.7 and Windows 10.
I decided to make this guide after I lost several hours trying to get Django to work with MySQL, this was a hassle! not so much that's complex to setup but rather to find the right wheel file that would work with these versions. And the graceful moment where you find out and finally got things to work :).
I use Python 3.4 as there does not seem to be a working mysqlclient build with Python 3.5 at the moment although I have an idea and will try this later (For a next guide).
So let's get started,
1. Download MySQL Installer for windows (here) and install MySQL


4. Now we need to install a compatible mysql python driver, this is in this case the "mysqlclient" Python package, but if you want this to be reliable you should :

5. Now back to django, "cd" to your project directory and enter the following in a win command line
'default': {
A small guide here on how to setup Django 1.10.4 with Python 3.4.3 and MySQL 5.7 and Windows 10.
I decided to make this guide after I lost several hours trying to get Django to work with MySQL, this was a hassle! not so much that's complex to setup but rather to find the right wheel file that would work with these versions. And the graceful moment where you find out and finally got things to work :).
I use Python 3.4 as there does not seem to be a working mysqlclient build with Python 3.5 at the moment although I have an idea and will try this later (For a next guide).
So let's get started,
1. Download MySQL Installer for windows (here) and install MySQL
- After install, launch MySQL Workbench and create a new db schema and a db user with dbadmin rights
- Select "custom install" and select "add path environm. variables"
- Once installed check your version in a win command line with , "Python --version"
- Create a new Python virtual environment for your project

- "cd" to the "SCRIPTS" folder created in your freshly created virtual environment folder and activate it. You should now see the name of your venv folder between parantheses in the front) to deactivate the environment enter "deactivate.bat" from the same location.

3. Install Django
- Install django with command "pip install django"

- First fetch the mysqlclient file for your platform here, (I used the mysqlclient-1.3.6-cp34-none-win_amd64.whl file)
- Then in a win command line enter : pip install C:\PATH\TO\THE\DOWNLOADED\FILE

5. Now back to django, "cd" to your project directory and enter the following in a win command line
- "django-admin startproject YourProjectname", this will create a new django web-project
- Go into the folder project and edit the settings.py file and make the following modifications to the DATABASES section in it,
'default': {
- Save
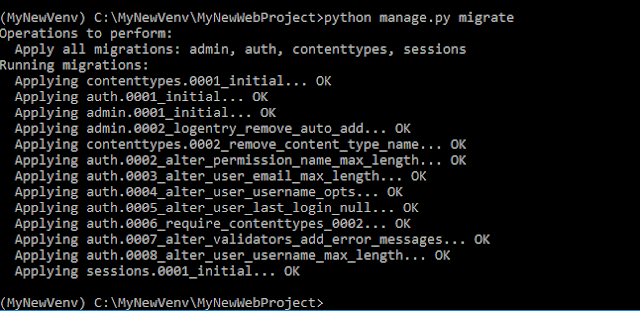
- Now ready to create the needed database tables for the Django project, Enter : "python manage.py migrate" and you should see the message displayed below.

Project ready to code :)
Subscribe to:
Posts (Atom)