Hej all,
I'm currently working on a Django web project that integrates some parts of youtube.com and for this purposes I wrote a small module to retrieve channel and video information aswell as searching for channel and videos based on keywords.
The module is working fine for the above and still work in progress, I will add Oauth2 support and allow for maintenance operations to be done as well.
The source and distribution is available on GIT : https://github.com/dtrammer/YoutubeAPI
Enjoy and happy coding !
Tuesday, December 27, 2016
How to - configure Visual Studio Code with Python 3.5.2 virtual project
Hej all,
A small how-to on how to configure Visual Studio Code to launch the python interpreter for your current virtual environment you're working with.
1. Open your Python project folder in Visual Studio Code
2. In the folder root create a new directory -> ".vscode" (Skip this step if it's already there)
3. In the ".vscode" directory create a new file -> "settings.json"
Add the following text to this file and save :
{
"python.pythonPath":"C:\\PATH\\TO\\YOUR\\VIRTUAL\\PROJECT\\FOLDER\\Scripts\\python",
"python.autoComplete.extraPaths": [
"C:\\PATH\\TO\\YOUR\\VIRTUAL\\PROJECT\\FOLDER\\Scripts",
"C:\\PATH\\TO\\YOUR\\VIRTUAL\\PROJECT\\FOLDER\\Lib\\site-packages"
]
}
4. In the ".vscode" directory create a new file -> "tasks.json"
Add the folowing text to this file and save :
{
"version": "0.1.0",
"command": "C:\\PATH\\TO\\YOUR\\VIRTUAL\\PROJECT\\FOLDER\\Scripts\\python",
"isShellCommand": true,
"showOutput": "always",
"args": ["${file}"]
}
A small how-to on how to configure Visual Studio Code to launch the python interpreter for your current virtual environment you're working with.
1. Open your Python project folder in Visual Studio Code
2. In the folder root create a new directory -> ".vscode" (Skip this step if it's already there)
3. In the ".vscode" directory create a new file -> "settings.json"
{
"python.pythonPath":"C:\\PATH\\TO\\YOUR\\VIRTUAL\\PROJECT\\FOLDER\\Scripts\\python",
"python.autoComplete.extraPaths": [
"C:\\PATH\\TO\\YOUR\\VIRTUAL\\PROJECT\\FOLDER\\Scripts",
"C:\\PATH\\TO\\YOUR\\VIRTUAL\\PROJECT\\FOLDER\\Lib\\site-packages"
]
}
- This will enable auto-complete, debug and to run the scripts with right-click on the file "Run python file in terminal"
4. In the ".vscode" directory create a new file -> "tasks.json"
Add the folowing text to this file and save :
{
"version": "0.1.0",
"command": "C:\\PATH\\TO\\YOUR\\VIRTUAL\\PROJECT\\FOLDER\\Scripts\\python",
"isShellCommand": true,
"showOutput": "always",
"args": ["${file}"]
}
- This enables you to use "cntrl+shift+B" and run the actual selected script file
You simply restart Visual Studio Code and you're ready to go, happy coding !
Sunday, December 18, 2016
Guide - How to setup Django 1.10 with Python 3.5.2 x64 and MySQL 5.7 x64 on Windows 10 x64
Hej all,
I published a guide yesterday on how to setup Django with MySQL and Python 3.4.3,
I mentioned that I will test for the latest Python 3.5.2 release, and got this to work.
Basically you can follow the steps of the guide mentioned above except for step 4 (mysqlclient installation). Here you can use the following wheel file instead.
Works like a charm ;) and happy coding !
Saturday, December 17, 2016
Guide - How to setup Django 1.10.4 with Python 3.4.3 x64 and MySQL 5.7 x64 - Windows10 x64
Hej all!
A small guide here on how to setup Django 1.10.4 with Python 3.4.3 and MySQL 5.7 and Windows 10.
I decided to make this guide after I lost several hours trying to get Django to work with MySQL, this was a hassle! not so much that's complex to setup but rather to find the right wheel file that would work with these versions. And the graceful moment where you find out and finally got things to work :).
I use Python 3.4 as there does not seem to be a working mysqlclient build with Python 3.5 at the moment although I have an idea and will try this later (For a next guide).
So let's get started,
1. Download MySQL Installer for windows (here) and install MySQL


4. Now we need to install a compatible mysql python driver, this is in this case the "mysqlclient" Python package, but if you want this to be reliable you should :

5. Now back to django, "cd" to your project directory and enter the following in a win command line
'default': {
A small guide here on how to setup Django 1.10.4 with Python 3.4.3 and MySQL 5.7 and Windows 10.
I decided to make this guide after I lost several hours trying to get Django to work with MySQL, this was a hassle! not so much that's complex to setup but rather to find the right wheel file that would work with these versions. And the graceful moment where you find out and finally got things to work :).
I use Python 3.4 as there does not seem to be a working mysqlclient build with Python 3.5 at the moment although I have an idea and will try this later (For a next guide).
So let's get started,
1. Download MySQL Installer for windows (here) and install MySQL
- After install, launch MySQL Workbench and create a new db schema and a db user with dbadmin rights
- Select "custom install" and select "add path environm. variables"
- Once installed check your version in a win command line with , "Python --version"
- Create a new Python virtual environment for your project

- "cd" to the "SCRIPTS" folder created in your freshly created virtual environment folder and activate it. You should now see the name of your venv folder between parantheses in the front) to deactivate the environment enter "deactivate.bat" from the same location.

3. Install Django
- Install django with command "pip install django"

- First fetch the mysqlclient file for your platform here, (I used the mysqlclient-1.3.6-cp34-none-win_amd64.whl file)
- Then in a win command line enter : pip install C:\PATH\TO\THE\DOWNLOADED\FILE

5. Now back to django, "cd" to your project directory and enter the following in a win command line
- "django-admin startproject YourProjectname", this will create a new django web-project
- Go into the folder project and edit the settings.py file and make the following modifications to the DATABASES section in it,
'default': {
- Save
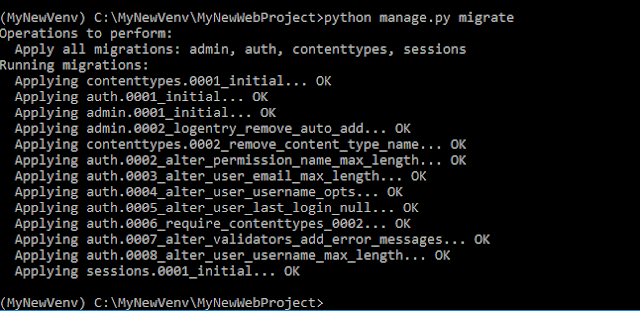
- Now ready to create the needed database tables for the Django project, Enter : "python manage.py migrate" and you should see the message displayed below.

Project ready to code :)
Sunday, December 11, 2016
Axis network camera \ devices Action & Event web-services C# library
I just finished this project and wanted to share it with the web,
The new VAPIX Action and Event services API that is available as from firmware 5.50+ uses web-services with SOAP as message content. As it can be a tedious task for new ADP partners to integrate this important feature, the aim of the library is to encapsulate all the SOAP messaging happening and to provide strongly typed objects and methods to deal with the different aspects of the new API. With the source available it's also a good way for helping you better understand the API or refactoring the library to your needs. The API is available on all Axis devices cameras, PACS, network speaker etc ...
Save yourself some time and pain ;-) and try it out, you simply download the dll from the source mentioned above and reference it into your existing VS project.
DTR
Subscribe to:
Posts (Atom)